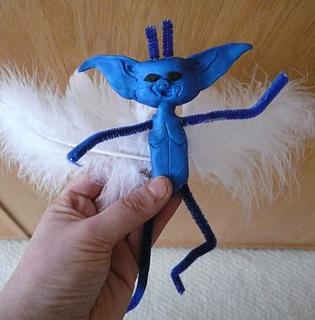
Fellow Slytherins, it has finally arrived, the moment you all have been waiting so desperately for. Now as our beloved Gilderoy Lockhart once said, "Know only that no harm can befall you whilst I am here. All I ask is that you remain calm." So ladies and gentleman, make sure to silence those screams of excitement because today we're making our very own blue devils: Cornish Pixies.
These are the supplies you will need:
Blue polymer clay (modeling clay works too, it just won't harden)
Black polymer clay (modeling clay works too, it just won't harden)
Blue pipe cleaners
White feathers in assorted sizes
Hot glue gun
Glue sticks
Scissors
Toothpicks
To begin, remove a two inch piece of the blue clay. Using your hands, flatten the piece with your hands, while trying to retain the rectangular shape as much as possible. Next, fold it in half, then fold it again in the middle so that the middle portion is thicker than the outside portions. At this point, it should look like this:

Next, smooth the clay out, while pinching the outer portions to make the shape of ears. Once it is smooth, and the shape of the ears are done, it should look like this:

Now, it's time to make some of the facial features. To make the eyes, use a tiny piece of the black clay, around half the size of a pea. Roll the piece into a smooth ball, then pinch it slightly with your fingers to flat it. Place them on the top portion of the pixie's face. Then, using the blue clay again, take a piece similar in size, roll it in a smooth ball, then pinch it until it is flattened. Use a toothpick to poke two nostril holes, then attach it to the middle portion of the head. You can also use the toothpick to create lines to show the inside dimensions of the ears. However, this step is completely optional. Your pixie will turn out just fine without that step.
The next step, we'll start working on the body, so remove another two inch portion of the blue clay. Flatten this piece as well, while still trying to maintain it's original rectangle shape. Pinch the piece at the top to shape the neck portion. At this point, the body should look like this:

At this point, although optional, you can take the toothpick and draw pectoral muscle lines on the body of your pixie. Next, connect the head and neck together by molding the clay together with your fingers. Then, choose four feathers, in two different sizes. Flip the pixie over, and insert the smaller feathers into the top of the pixie's back, and the larger feather into the lower portion of the back. Then, gently remove the feathers, leaving the holes.
Next, take the pipe cleaners and cut them into various lengths to be used as: the horns for the head, the arms, and the legs. Stick these pieces of pipe into their appropriate locations, and then gently remove them, leaving the holes. Place the pixie and bake it according the the packaging instructions on the clay. Once you have finished baking, and the pixie has cooled, insert its pipe cleaner limbs, and its feathers into the holes you made before baking it. When you're done, you should get a cute little creature that looks somewhat like this:

When making your creatures, feel free to customize them to your hearts content. Hope you enjoyed this crafts project.
Until next time my crafty friends,
-Artemisia
